Skills & Concepts You'll Gain
- How to connect and use a DHT11 temperature & humidity sensor
- How to install and use an Arduino library
- How to read sensor data and print it to Serial Monitor
- Understanding digital sensors and how they communicate with Arduino
- Foundation for building weather stations, smart fans, and IoT projects
Tech Used: Arduino UNO, DHT11 Sensor, Arduino IDE, DHT Library
Components Needed
- Arduino UNO
- 1x DHT11 Temperature & Humidity Sensor
- 1x 10kΩ Resistor (pull-up)
- Breadboard
- Jumper Wires
- USB Cable
Software Required
- Arduino IDE
- DHT Sensor Library by Adafruit
Step 1
Understand the DHT11 Sensor
Before connecting anything, let's understand what the DHT11 sensor looks like and what each pin does.
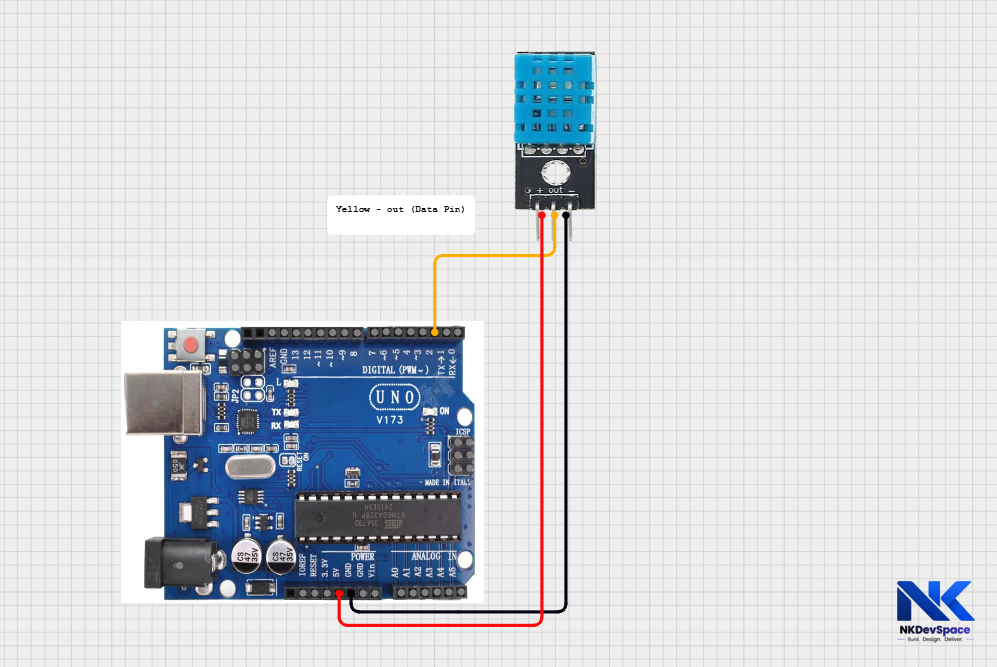
The DHT11 has 3 pins (some modules have 4 - the extra one is not used):
- VCC - Power pin. Connect to 5V on Arduino
- DATA - Signal pin. This sends temperature and humidity data to Arduino. Connect to Pin 2
- GND - Ground pin. Connect to GND on Arduino
If you have a DHT11 module (with a small PCB board), it already has the resistor built in - you can connect it directly without an extra resistor!
Step 2
Wire the Circuit
Connect the DHT11 sensor to your Arduino using the breadboard.
- Place the DHT11 sensor on the breadboard
- Connect VCC pin → 5V on Arduino
- Connect GND pin → GND on Arduino
- Connect DATA pin → Pin 2 on Arduino
- Connect a 10kΩ resistor between the DATA pin and VCC (this is called a pull-up resistor - it keeps the signal stable)
Wiring Diagram
Ensure correct VCC and GND connections before powering on to prevent damage. The DHT11 is suitable for basic use; for higher accuracy, use a DHT22 sensor. Keep the sensor in an open, well-ventilated area away from heat sources for reliable readings.
Step 3
Install the DHT Library
The DHT11 sensor needs a special library to work easily. Here's how to install it:
- Open Arduino IDE
- Go to Sketch → Include Library → Manage Libraries
- In the search box, type DHT sensor library
- Find the one by Adafruit and click Install
- When asked to install dependencies, click Install All
A library is like a helper toolkit - it gives you ready-made functions so you don't have to write complex code from scratch.
Step 4
Write the Code by opening Arduino UNO
Open Arduino IDE, create a new sketch, and paste this code:
temperature_sensor.ino
// Temperature Sensor - NKDevSpace Tutorial
#include <DHT.h>

#define DHTPIN 2       // Data pin connected to Pin 2
#define DHTTYPE DHT11  // We are using DHT11 sensor

DHT dht(DHTPIN, DHTTYPE);

void setup() {
  Serial.begin(9600);  // Start Serial Monitor at 9600 speed
  dht.begin();         // Start the DHT sensor
  Serial.println("Temperature Sensor Ready!");
}

void loop() {
  delay(2000);  // Wait 2 seconds between readings

  float humidity    = dht.readHumidity();
  float temperature = dht.readTemperature();  // Celsius by default

  // Check if reading failed
  if (isnan(humidity) || isnan(temperature)) {
    Serial.println("Failed to read from DHT sensor!");
    return;
  }

  Serial.print("Temperature: ");
  Serial.print(temperature);
  Serial.println(" °C");

  Serial.print("Humidity: ");
  Serial.print(humidity);
  Serial.println(" %");

  Serial.println("-------------------");
}
Step 5
Code Explanation
Let's understand what each part does in simple words:
#include <DHT.h>This loads the DHT library we installed. This loads the DHT library required to communicate with the sensor(Think of it like opening a toolbox before starting work).
#define DHTPIN 2define creates a name for a value. Here we're saying "DHTPIN means pin number 2". This makes the code easier to read and change later.
DHT dht(DHTPIN, DHTTYPE);This creates a dht object - think of it as telling Arduino "I have a DHT11 sensor connected to pin 2, remember that."
Serial.begin(9600);This opens a communication channel between Arduino and your computer so we can see the temperature values printed on screen. 9600 is the speed of communication.
dht.readTemperature()This asks the sensor "what is the current temperature?" and gives back a number in Celsius. The result is stored in the temperature variable.
isnan(temperature)isnan means "is not a number". If the sensor fails to read, it returns an invalid value. This check prevents printing garbage data.
Step 6
Upload & See Results
- Make sure your Arduino Uno is connected to your laptop using a USB cable
- If not already selected, set the correct options:
- Go to Tools → Board → Arduino AVR Boards → Arduino Uno
- Go to Tools → Port → COM X(COM 3, COM4, ...) (Arduino Uno)
- Click the Upload (→) button in Arduino IDE
- Wait until you see the message Done uploading
- Open Tools → Serial Monitor (or press Ctrl + Shift + M)
- Set the baud rate to 9600 at the bottom right
- You should see temperature and humidity values printing every 2 seconds
Try breathing near the sensor. The humidity value should increase, which confirms the sensor is working properly.
Step 7
Try It Yourself - Challenges
Now that it's working, try these to go further:
- Add an LED that turns ON when temperature goes above 30°C
- Add a buzzer that beeps when temperature is too high
- Display temperature on an LCD screen instead of Serial Monitor
- Read temperature in Fahrenheit - use
dht.readTemperature(true)