Skills & Concepts You'll Gain
- How an ultrasonic sensor measures distance using sound waves
- How to control a servo motor to rotate to specific angles
- How to combine multiple components to create a smart automated system
- Understanding trigger and echo pins for distance measurement
- Foundation for building automation, robotics, and IoT projects
Tech Used: Arduino UNO, HC-SR04 Ultrasonic Sensor, SG90 Servo Motor, Arduino IDE, Servo Library
Components Needed
- Arduino UNO
- 1x HC-SR04 Ultrasonic Sensor
- 1x SG90 Servo Motor
- Breadboard
- Jumper Wires
- USB Cable
- Small box or dustbin (optional)
Software Required
- Arduino IDE
- Servo Library (built-in)
Step 1
Understand the Components
HC-SR04 Ultrasonic Sensor - This sensor sends out a sound wave (similar to how bats use echolocation) and measures how long it takes to bounce back. From that time, it calculates the distance to an object.
It has 4 pins:
- VCC → 5V on Arduino
- GND → GND on Arduino
- TRIG → Pin 9 (we send a signal here to start measuring)
- ECHO → Pin 10 (we receive the bounced signal here)
SG90 Servo Motor - A small motor that can rotate to exact angles (0° to 180°). We'll use it to open and close the dustbin lid.
- Red wire → 5V on Arduino
- Brown/Black wire → GND on Arduino
- Orange/Yellow wire → Pin 6 on Arduino (control signal)
Step 2
Wire the Circuit
Connect both components to the Arduino:
- Connect HC-SR04 VCC → 5V, GND → GND, TRIG → Pin 9, ECHO → Pin 10
- Connect Servo red wire → 5V, brown wire → GND, orange wire → Pin 6
- Attach the servo motor to the dustbin lid using tape or a small bracket
Wiring Diagram
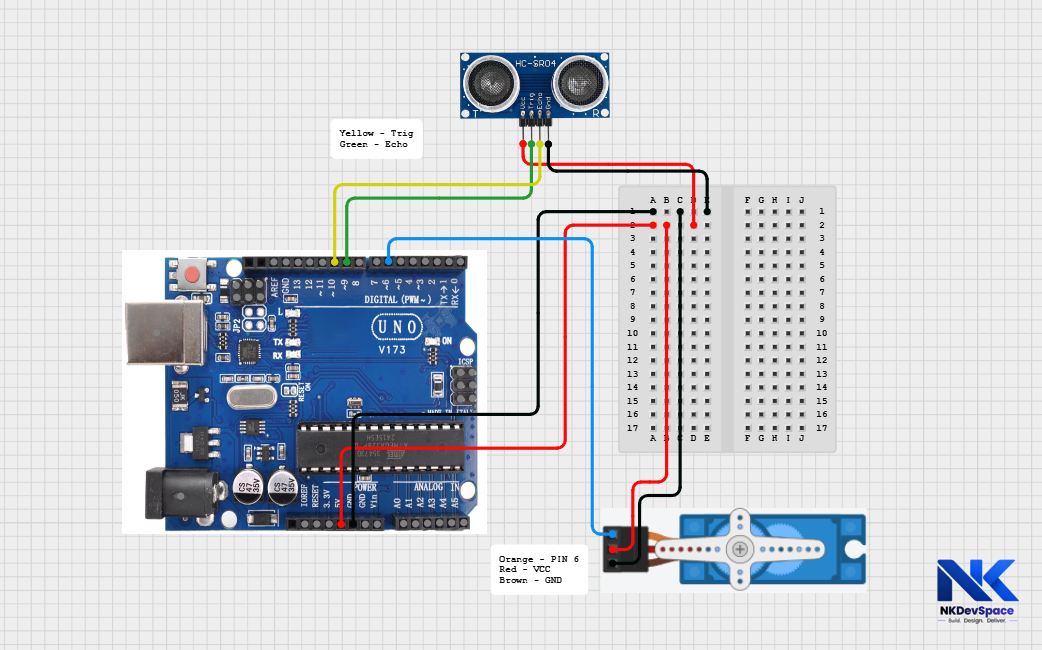
Position the ultrasonic sensor on the front, facing outward at a slight upward angle for better detection. Ensure stable power for the servo; use an external 5V supply if needed to avoid erratic behavior.
Step 3
Write the Code by opening Arduino UNO
smart_dustbin.ino
// Smart Dustbin - NKDevSpace Tutorial
#include <Servo.h>

Servo lidServo;

const int trigPin = 9;
const int echoPin = 10;
const int servoPin = 6;

void setup() {
  pinMode(trigPin, OUTPUT);
  pinMode(echoPin, INPUT);
  lidServo.attach(servoPin);
  lidServo.write(0);   // Start with lid closed
  Serial.begin(9600);
}

long getDistance() {
  // Send ultrasonic pulse
  digitalWrite(trigPin, LOW);
  delayMicroseconds(2);
  digitalWrite(trigPin, HIGH);
  delayMicroseconds(10);
  digitalWrite(trigPin, LOW);

  // Measure how long echo takes to return
  long duration = pulseIn(echoPin, HIGH);

  // Convert time to distance in cm
  long distance = duration * 0.034 / 2;
  return distance;
}

void loop() {
  long distance = getDistance();

  Serial.print("Distance: ");
  Serial.print(distance);
  Serial.println(" cm");

  if (distance > 0 && distance < 20) {
    // Hand is close - open the lid
    lidServo.write(90);   // Rotate to 90 degrees (open)
    delay(3000);          // Keep open for 3 seconds
    lidServo.write(0);    // Close the lid
    delay(2000); // prevent immediate retrigger
  }

  delay(200);
}
Step 4
Code Explanation
#include <Servo.h>Loads the Servo library - this is built into Arduino IDE so no installation needed. It gives us easy functions to control the servo motor.
lidServo.write(90)Tells the servo motor to rotate to 90 degrees. This opens the lid. write(0) closes it back. You can adjust the angle based on your dustbin design.
digitalWrite(trigPin, HIGH) for 10 microsecondsThis sends a tiny ultrasonic pulse (sound wave) from the sensor. It's like shouting "hello!" and waiting for the echo to come back.
duration * 0.034 / 2Sound travels at 0.034 cm per microsecond. We divide by 2 because the sound travels to the object and back - so we only want the one-way distance.
if (distance < 20)If the detected object is less than 20 cm away, we consider it a hand approaching. You can change 20 to any distance that works for your dustbin.
Step 5
Upload & Test
- Make sure your Arduino Uno is connected to your laptop using a USB cable
- If not already selected, set the correct options:
- Go to Tools → Board → Arduino AVR Boards → Arduino Uno
- Go to Tools → Port → COM X(COM 3, COM4, ...) (Arduino Uno)
- Click the Upload (→) button to upload the code
- Open Tools → Serial Monitor
- Set the baud rate to 9600
- You will see the distance values printing continuously
- Bring your hand within 20 cm of the sensor
- The servo motor should rotate and open the lid
- After 3 seconds, the lid should close automatically
If the servo does not open properly, change the angle value in the code. For example, try write(120) or write(150) for a wider opening depending on your lid design.
Step 6
Try It Yourself - Challenges
- Add an LED that glows green when the lid is open
- Add a second ultrasonic sensor to detect when the bin is full
- Add a buzzer that beeps when the bin is full
- Change the open duration from 3 seconds to 5 seconds